

Do you love editing videos to produce fantastic personal creations before sharing them on platforms like Dailymotion, Vimeo, Twitch, YouTube, Metacafe, and Flickr? Have you ever dreamed of becoming a film director and expressing your ideas through video? If so, your journey can begin with Final Cut Pro. Edit your recordings in Final Cut Pro and bring your vision to life.
Recently, Apple released a major new version of its professional video editor – Final Cut Pro 12, alongside updates to Final Cut Pro for iPad and Final Cut Camera. This latest release introduces several powerful enhancements, including:
- AI‑powered features for magnetic masking and automatic timeline management
- Native support for Apple Intelligence and Spatial Video editing
- Enhanced RED camera support and improved stability
- Optimized performance for both Apple Silicon and Intel‑based Mac computers
Final Cut Pro supports a wide range of video and audio formats, but there is a distinction between what can be imported and what works natively. You might find yourself wondering: Why won’t Final Cut Pro import my MP4? Does Final Cut Pro support MOV files? This guide will answer those questions and show you how to work with virtually any media format.
Final Cut Pro offers everything a professional video editor needs. You can import media from multiple devices (including 8K video), apply over 100 filters and special effects, and use dedicated tools for text layers and subtitles. The app also provides powerful color grading tools to optimize image quality. Let’s dive into what video and audio formats Final Cut Pro supports, so you know exactly what you can import for editing.
Part 1: What’s New in Final Cut Pro 12
Apple’s latest version of Final Cut Pro brings several enhancements and fixes:
- Magnetic Mask – AI‑driven masking that automatically isolates subjects without a green screen
- Transcribe to Captions – Automatically generate closed captions for your timeline using Apple’s on‑device language model
- Spatial Video Editing – Edit spatial videos captured on iPhone and adjust depth settings
- AI and Apple Intelligence support – Enabled by Neural Engine on Apple Silicon Macs
- Improved stability when playing back H.264 video files with corrupt data
- Native RED RAW decoding and playback via a new Universal RED plugin (works on both Apple Silicon and Intel‑based Macs)
- Enhanced stability when using AirPlay with Final Cut Pro on Apple Silicon Macs
- Various bug fixes and performance improvements
Minimum System Requirements for Final Cut Pro 12
- macOS 13.5 or later (macOS 15.0 or later recommended for Apple Intelligence features)
- 4GB of RAM (8GB recommended for 4K editing, 3D titles, and 360° video)
- 1GB of VRAM recommended for 4K editing, 3D titles, and 360° video
- Apple Silicon or Intel‑based Mac
Part 2: Final Cut Pro 12 Supported Import Formats
Final Cut Pro natively supports a comprehensive range of formats, including:
Professional Codecs:
- Apple ProRes (all versions)
- Apple ProRes RAW and ProRes RAW HQ
- Apple Animation Codec
- Apple Intermediate Codec
- Uncompressed 10‑bit and 8‑bit 4:2:2
- REDCODE RAW (R3D) – requires RED plugin
- Canon Cinema RAW Light – requires Canon plugin
Compressed Formats:
- H.264 (AVC)
- HEVC (H.265) – macOS High Sierra 10.13 or later
- H.264 from Apple devices, GoPro, DSLR, and iFrame cameras
- Motion JPEG (OpenDML only)
- MPEG IMX (D‑10)
Camera & Broadcast Formats:
- AVCHD (including AVCCAM, AVCHD Lite, and NXCAM)
- AVC‑ULTRA (including AVC‑LongG, AVC‑Intra Class 50/100/200/4:4:4, and AVC‑Intra LT)
- XAVC (including XAVC‑S, XAVC‑L)
- XF‑HEVC
- XF‑AVC
- XDCAM HD/EX/HD422
- DV (including DVCAM, DVCPRO, and DVCPRO50)
- DVCPRO HD
- HDV
- MXF‑wrapped media
- Panasonic AVC‑Ultra
- Sony IMX, XDCAM (EX, HD, HD422), XAVC, XAVC S, and XAVC‑L
- Canon XF MPEG‑2
- Canon XF‑AVC
- JVC‑created XDCAM EX
- JVC H.264 Long GOP
Containers & Other Formats:
- QuickTime Movie (.mov)
- MPEG‑4 (.mp4)
- MTS files from AVCHD cameras
- iFrame
Still Images:
- PSD, BMP, GIF, RAW, JPEG, PNG, TGA, and TIFF
Audio Formats:
- AAC, AIFF, CAF, MP3, MP4, and WAV
- Broadcast Wave Format
- SDII audio files
Part 3: Best Format Converter for Final Cut Pro
When it comes to converting unsupported video files for Final Cut Pro, Acrok Video Converter Ultimate for Mac is the tool we highly recommend. It’s a professional-grade media converter designed to handle virtually any video format – from common files like MP4, MOV, and MKV to more specialized formats like MXF, MTS, BRAW, and even Blu-ray/DVD content.
Why Acrok Video Converter Ultimate Stands Out
Optimized for Final Cut Pro
Acrok Video Converter Ultimate offers dedicated output profiles specifically for Final Cut Pro. With just a few clicks, you can convert your videos to Apple ProRes 422 or ProRes 4444 MOV – the native editing codec that Final Cut Pro loves. This ensures smooth playback, fast rendering, and zero compatibility issues when you import your footage.
Wide Format Support
The software supports an extensive range of input and output formats, including:
- Input: MP4, MOV, MXF, MKV, AVI, WMV, MTS, TS, FLV, M4V, MPEG, VOB, and more
- Output: Apple ProRes, H.265/HEVC, DNxHD, DVCPRO, AIC, MP4, MOV, AVI, MKV, and many others
- Source types: Regular video files, DVD folders, ISO/IFO files, and Blu-ray discs
Built-in Video Editing Tools
Beyond conversion, Acrok includes a full suite of editing features:
- Trim and crop video to remove unwanted sections
- Merge multiple clips into one seamless file
- Split large videos into smaller parts
- Add subtitles (.ass, .ssa, .srt)
- Apply watermarks (text or image)
- Adjust brightness, contrast, saturation, and volume
- Convert 2D videos to 3D
- Add fade-in/fade-out audio effects
Batch Conversion & Hardware Acceleration
Process multiple files simultaneously to save time. The software also leverages GPU acceleration for significantly faster conversion speeds – so you won’t be waiting hours for large 4K files to finish.
Quality Preservation
A side-by-side quality comparison showed absolutely no discernible difference between original and converted footage. The software compresses large 4K/8K files from GBs to MBs without compromising quality.
Cross-Platform Availability
Acrok Video Converter Ultimate is available for both Mac and Windows, and supports macOS from 10.7 through the latest versions.
Pricing & Trial
The software offers a free trial so you can test it before committing. A lifetime license is available at a competitive price point.
Part 4: How to Convert Unsupported Formats for Final Cut Pro
Follow these simple steps to convert your unsupported videos:
Step 1: Load Your Videos
Launch Acrok Video Converter Ultimate for Mac on your computer. Click Add File(s) or Add Folder to load your unsupported source videos. You can also simply drag and drop files directly into the software window. Preview your videos in the preview pane on the right.

Step 2: Choose a Final Cut Pro Native Format
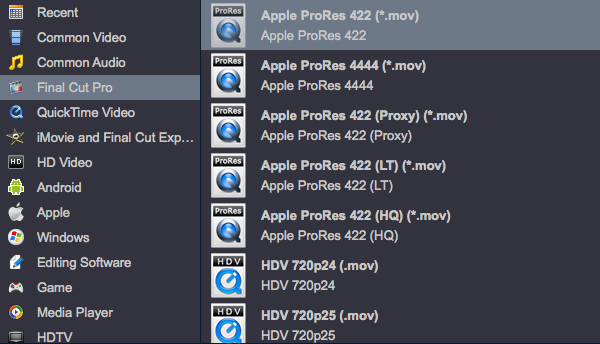
Click the Format option to select your output format. Which format works best? Apple ProRes MOV is highly recommended. Under the Final Cut Pro category, choose either:
- Apple ProRes 422 (*.mov) – ideal for most workflows, balancing quality and file size
- Apple ProRes 4444 (*.mov) – supports alpha channels and higher bit depth, perfect for compositing and VFX
Tips:
- If the default settings don’t meet your needs, click the Settings button to customize video/audio parameters – bitrate, frame rate, resolution, channels, and more. Higher bitrates produce better quality but larger files.
- Use the built‑in Edit feature to trim, crop, add watermarks, subtitles, or apply special effects before conversion.
Step 3: Start the Conversion
Hit the Convert button in the bottom‑right corner to begin encoding your video to ProRes. Once finished, click the Open button to locate your converted files. They will now work seamlessly in Final Cut Pro 11.
Part 5: Two Ways to Import Files into Final Cut Pro
Method 1: Drag and Drop
The simplest method is to drag clips directly from your desktop or Finder into Final Cut Pro.
How to do it:
- Select the media you want to import.
- Drag the clips from your desktop or Finder into the Final Cut Pro timeline or event library.
- Be careful not to overwrite existing clips in your timeline – unless that’s what you intend.
Method 2: Using the Import Menu
For more control, use the dedicated import function.
Step 1: Go to File > Import > Media, or press Command + I on your keyboard.
Step 2: Use the media import window to browse and select your clips. (Avoid double‑clicking files until you’re ready to import.)
Step 3: Select your desired clips and click the Import button in the bottom‑right corner. Your clips will now appear in your project panel, ready for editing.
Final Thoughts
Final Cut Pro 11 is an incredibly powerful tool, but its format support has limits. If you encounter unsupported files, converting them to Apple ProRes MOV is the most reliable solution. With a dedicated converter like Acrok Video Converter Ultimate for Mac, you can quickly transcode any video to a Final Cut Pro‑friendly format – preserving quality and saving time.
Now that you know which formats work and how to convert the rest, you’re ready to edit anything. Happy cutting!
Tip: Keep your children safe both online and in the real world with our parental tracking app. Monitor their GPS location, see who they are texting and talking to on Facebook or WhatsApp, what videos and images they share, and much more!