

I’ve just finished editing some BRAW footage in DaVinci Resolve on Windows 11, and now I’m planning to use Final Cut Pro for color grading. The problem is, I need to convert my files to ProRes 422 to work with this software. As you know, this codec is tightly integrated with Final Cut Pro—but I’m not a Mac user. How can I convert my files to ProRes 422 and then relink my DaVinci Resolve project with the new ProRes files? — Thorsen, Rodney
Can anyone share a reliable BRAW to ProRes converter? I plan to edit Blackmagic Design BRAW in Final Cut Pro, but I failed to import them directly. A friend told me I should transcode the BRAW files to ProRes video first. How do I do that? — Wolf, Greg
Want to transcode BRAW to ProRes for smooth editing in Final Cut Pro? This article will teach you how to convert BRAW video to the ProRes codec on both Mac and Windows 11, step by step.
Apple’s ProRes family of codecs has become an integral part of modern post-production workflows. Whether you’re offline editing Blackmagic Design BRAW footage or working directly with 8K, 6K, or 4K camera negatives, there’s a good chance you’ll eventually want to work in ProRes for its exceptional performance and quality retention.
What exactly is BRAW?
BRAW is not just a file container; it’s a visually lossless video codec developed by Blackmagic Design. It uses a lossy compression algorithm with remarkably low image distortion, meaning users can hardly perceive any visual artifacts—even at high compression ratios. This makes it incredibly efficient for storage, but it also presents challenges for editing.
Why convert BRAW to ProRes?
Users who want to edit Blackmagic Design’s BRAW footage on a Mac with Final Cut Pro, Premiere Pro, or Avid Media Composer often run into incompatibility issues or choppy playback. This is especially true when dealing with high-resolution 8K, 6K, or even 4K BRAW files.
Why does this happen? Because BRAW files, while already highly compressed for storage, are computationally intensive to decode during real-time video editing. ProRes, on the other hand, is a lossy video compression format developed by Apple Inc. specifically optimized for smooth, real-time editing performance on macOS. Therefore, if you have BRAW recordings and want to edit them flawlessly in Final Cut Pro (or even Premiere Pro on a Mac), transcoding BRAW to Apple ProRes is strongly recommended as a best practice.
In this guide, we’ll show you exactly how to convert BRAW files to ProRes—not just on macOS, but also on Windows 11, which is a common workflow for hybrid editors.
The Two-Step Workflow: Why Can’t We Convert Directly?
Currently, the BRAW format is natively compatible only with Blackmagic cameras and DaVinci Resolve (Blackmagic Design’s own editing and color-grading application). If you want to convert or edit BRAW video, DaVinci Resolve is your only free and official gateway. However, DaVinci Resolve does not support exporting directly to ProRes on Windows, and even on Mac, its ProRes export options can be limited depending on your version.
To get the job done, we’ll divide the conversion process into two simple parts:
- Use DaVinci Resolve to transcode the BRAW footage into a universally editable format like MP4 (H.264).
- Use a professional Apple ProRes encoder—such as Acrok Video Converter Ultimate—to convert that MP4 file into the final ProRes 422 or ProRes 4444 MOV file.
Part 1: Convert BRAW to MP4 with DaVinci Resolve
Step 1: Download and install the latest version of DaVinci Resolve from the official Blackmagic Design website (it’s free for standard features).
URL: https://www.blackmagicdesign.com/products/davinciresolve
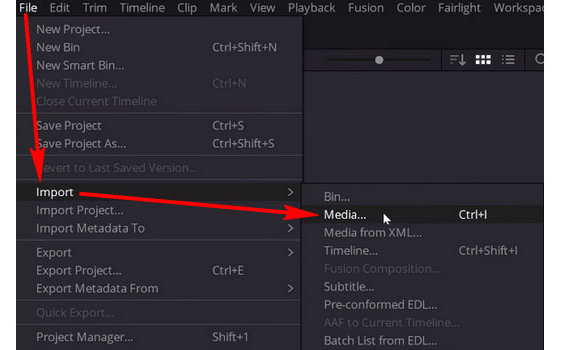
Step 2: Launch DaVinci Resolve. In the top-left menu, click File > Import > Media… to load your BRAW files into the media pool.
Step 3: At the bottom of the screen, switch to the Deliver tab. This is DaVinci Resolve’s dedicated export module.

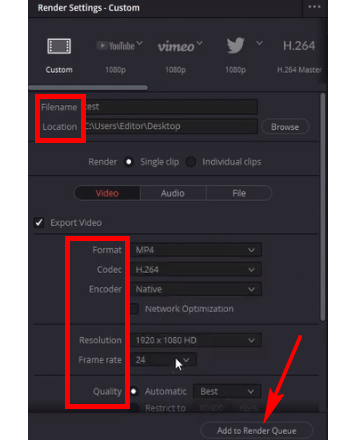
Step 4: In the Render Settings panel (located on the upper-left of the workspace), configure your export options:
- Set Format to MP4.
- Set Codec to H.264 (or H.265 if you prefer better quality per file size).
- Adjust Resolution, Frame Rate, and Quality according to your needs. (We recommend keeping the original resolution and frame rate to preserve quality for the next step).
- Once you’re satisfied with the settings, click Add to Render Queue at the bottom right.
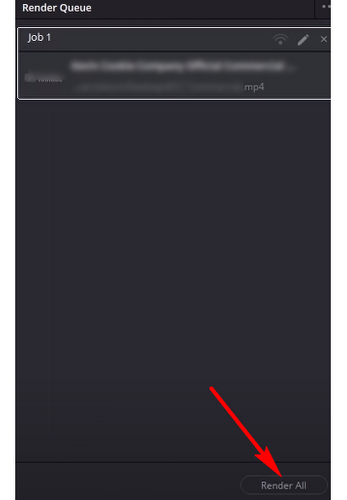
Step 5: Navigate to the Render Queue panel on the upper-right. Click Render All to start exporting your BRAW files as standard MP4 videos. DaVinci Resolve will process the files and save them to your specified output folder.
Part 2: Convert the Exported MP4 to ProRes with a Dedicated Encoder
Now that we have our MP4 files, the next question is: Is there a reliable video encoding tool that can convert them to ProRes 422 and ProRes 4444?
While there aren’t many programs that handle Apple’s proprietary ProRes encoding efficiently on both platforms, a few tools stand out. Fortunately, Acrok Video Converter Ultimate (available for both Mac and Windows) is one of the best solutions for encoding and decoding the Apple ProRes codec. It supports Windows 11 and macOS 15 Sequoia seamlessly, with full hardware acceleration to keep the conversion fast.
With Acrok Video Converter Ultimate, converting any video file to ProRes is straightforward and takes just a few minutes. Follow the steps below to complete the conversion quickly and successfully.
Step 1: Install and launch the ProRes Converter
After downloading and installing the software from the official website, launch it. Click the Add File icon (or drag and drop) to load the MP4 videos you exported from DaVinci Resolve. You can preview the video in the built-in player window to confirm it’s the right clip.

Step 2: Select ProRes MOV as the output format
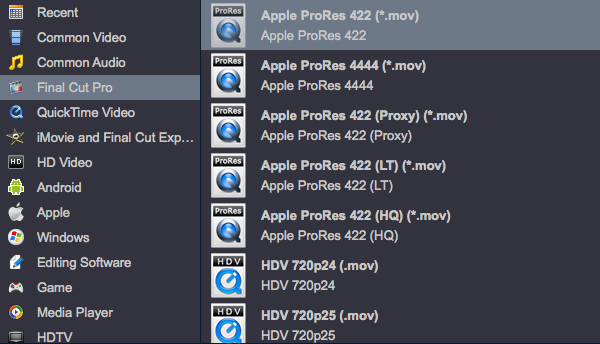
- For Mac Users: Click the Format bar on the main interface, then navigate to Final Cut Pro > Apple ProRes 422 (*.mov) or Apple ProRes 4444 (*.mov) . This preset ensures optimal compatibility and quality when working with the output files in Final Cut Pro.
- For Windows Users: Click the Format bar, then select Apple ProRes 422 MOV under the Editing Software category. (Don’t worry—this works perfectly on Windows and the resulting file will be fully compatible with Mac editing suites).
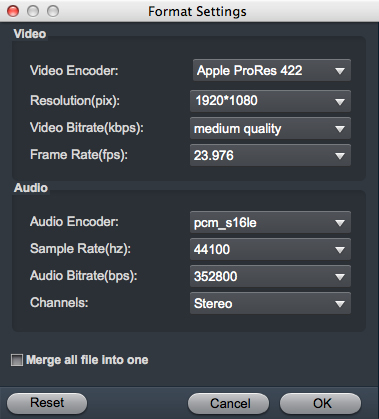
Step 3: Fine-tune output settings (optional)
For even better video and audio quality, you can click the Settings button next to the format profile. Here, you can manually define parameters such as:
- Video Encoder (keep as ProRes)
- Frame Rate (match your source)
- Video Bitrate (higher = better quality, but larger file size)
- Resolution (keep as 1920×1080, 3840×2160, etc.)
- Audio Encoder, Sample Rate, and Audio Bitrate (AAC or PCM are recommended for professional use).
Step 4: Utilize editing features (bonus)
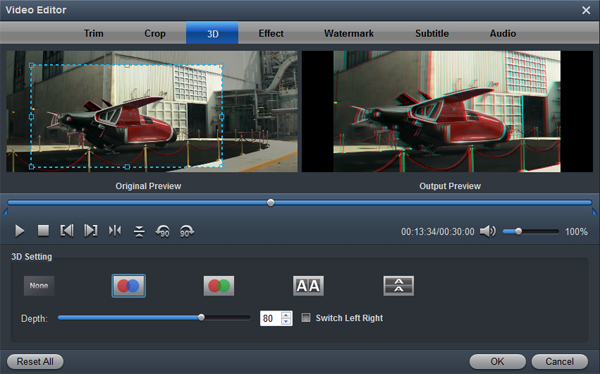
If you delve deeper into the software, you’ll find its built-in editing functions quite handy. To activate the Edit menu, first select a video file from the list, then click the Edit (scissors) icon on the toolbar. The “Video Editor” window allows you to:
- Trim or crop unwanted segments.
- Rotate or flip the image.
- Adjust volume or add audio tracks.
- Apply simple 3D effects or watermarking.
This is especially useful if you need to make slight adjustments before delivering the final ProRes master.
Step 5: Start the conversion
Once you’ve configured everything, click the Convert button at the bottom-right corner. The software will start encoding your video to ProRes 422 or ProRes 4444. Within minutes—depending on your hardware—you’ll have a high-quality, editing-ready ProRes MOV file that can be imported directly into Final Cut Pro, Premiere Pro, Avid, or any other professional NLE.
Bonus Tip: A Versatile Tool for More Than Just ProRes
Speaking of the other ways to preserve your media, while Acrok Video Converter Ultimate excels at ProRes conversion, it’s also a feature-rich Blu-ray Ripper and media toolbox.
If you are a Blu-ray collector, you’ll be pleased to know that this same program allows you to:
- Rip and convert 1080P and 4K Blu-ray Discs to regular video formats (MP4, MKV, AVI, etc.) with super-fast GPU-accelerated speed.
- Extract audio tracks from Blu-ray discs and save them as MP3, AAC, or FLAC.
- Back up your physical Blu-ray library to hard drives or NAS devices for long-term digital preservation.
- Convert and upload your ripped Blu-ray movies directly to platforms like TikTok, YouTube, or Vimeo to share with others.
So, whether you’re a professional videographer dealing with BRAW footage or a home cinema enthusiast looking to digitize a physical disc collection, this tool can serve as a reliable all-in-one solution for all your video conversion and ripping needs.
Final Thoughts
Converting BRAW to ProRes might seem like a cumbersome two-step process, but it’s actually the most reliable and professional way to ensure your footage is editable across different platforms—especially if you’re moving from DaVinci Resolve on Windows to Final Cut Pro on macOS. By using DaVinci Resolve for the initial extraction and a dedicated ProRes encoder like Acrok for the final packaging, you maintain the highest possible quality while gaining full compatibility with Apple’s ecosystem.
If you’re ready to streamline your post-production workflow, give this method a try and enjoy smooth, stutter-free editing in Final Cut Pro with your BRAW footage.