

Summary: Struggling to edit 4K XAVC HS (HEVC) in DaVinci Resolve or Final Cut Pro? This guide walks you through converting to Apple ProRes on Mac – fix lag, crashes, and long renders. Learn which ProRes profile to choose, step-by-step using Acrok Video Converter, plus hardware acceleration tips and proxy workflows for smooth, colour‑accurate editing.
XAVC HS is Sony’s advanced consumer/cinema format that uses H.265/HEVC compression to deliver 4K (and even 8K) video at remarkably low bitrates while preserving excellent image quality. It is commonly found in Sony’s Alpha mirrorless cameras (e.g., A7S III, A1) and professional camcorders. Unlike the older XAVC S (which uses H.264 and an .mp4 container), XAVC HS is wrapped in an MP4 container but relies on the more efficient HEVC codec, often supporting 10‑bit 4:2:2 colour sampling for richer grading.
However, this modern codec poses a problem for many non‑linear editing (NLE) systems:
- DaVinci Resolve – while it supports HEVC in principle, the free version may lack native HEVC decoding on some platforms, and even the Studio version can struggle with long‑GOP, high‑frame‑rate 4K XAVC HS files, leading to dropped frames, sluggish scrubbing, or outright import failures.
- Final Cut Pro – Apple’s NLE prefers ProRes (its intermediate codec) for optimal performance. FCP can ingest HEVC, but transcoding on import (using “Optimised Media”) is time‑consuming and inflexible. Direct editing of XAVC HS often results in rendering bottlenecks and export crashes.
Common user complaints (corrected from real forums):
“I can’t even play my 4K XAVC HS clips in DaVinci Resolve – they show as offline or have green frames.” – Greg D.
“Rendering XAVC HS in Final Cut Pro takes forever; my Mac overheats and the timeline stutters.” – Beatrix D.
The root cause is not that Resolve or FCP “doesn’t support” the format, but that long‑GOP interframe compression demands heavy real‑time decoding. The solution is to transcode to an intraframe‑based, edit‑friendly codec – and Apple ProRes is the gold standard on macOS.
Why ProRes Is the Ideal Target for XAVC HS
- ProRes 422 – delivers near‑visually lossless quality with moderate file sizes, ideal for 4K timelines.
- ProRes 4444 – preserves full colour gamut and alpha channels for VFX/green‑screen work.
- ProRes LT / Proxy – lighter options for offline editing on slower machines.
Converting XAVC HS to ProRes not only ensures smooth playback and real‑time grading in Resolve and FCP, but also future‑proofs your media – ProRes is universally supported across macOS, Windows (with appropriate plugins), and cloud workflows.
Choosing the Right Conversion Tool
While FFmpeg (command‑line) can transcode, it lacks hardware acceleration for HEVC on many Macs and offers limited parameter control. For a professional yet user‑friendly solution, we recommend Acrok Video Converter Ultimate for Mac (or similar tools like EditReady, Compressor, or Shutter Encoder). Acrok specifically:
- Supports hardware‑accelerated HEVC decoding (Intel QSV / Apple M‑series) for lightning‑fast conversion.
- Preserves HDR metadata (HLG / PQ) when converting to ProRes.
- Allows batch processing of multiple XAVC HS clips.
- Offers preset profiles for Final Cut Pro, DaVinci Resolve, and Avid Media Composer.
(Note: Always use the latest version to ensure HEVC 10‑bit support.)
Step‑by‑Step Guide: Transcoding XAVC HS to ProRes on Mac
Prerequisites:
- A Mac with macOS 10.15 or later (Apple Silicon or Intel with HEVC hardware support recommended).
- Sufficient free storage – ProRes files are ~5‑10× larger than original HEVC; plan accordingly.
Step 1 – Install and Launch the Converter
Download and install Acrok Video Converter Ultimate for Mac. Launch the application – you’ll see a clean interface with an “Add File” button and a drag‑and‑drop zone.
Step 2 – Import Your XAVC HS Files
Click “Add File” or simply drag your .mp4 (or .mxf if from a camcorder) XAVC HS clips into the Apple ProRes Converter. The software will parse the video streams; you can preview each clip and trim start/end points if needed.

Correction: Earlier articles mistakenly said Resolve only supports H.264 in MP4 – that is false. Resolve supports many codecs, but HEVC in long‑GOP is problematic. Transcoding to ProRes sidesteps this entirely.
Step 3 – Select ProRes Output Profile
Click the “Format” drop‑down menu. Navigate to the “Final Cut Pro” category (or “Editing”) and choose either:
- Apple ProRes 422 (*.mov) – best balance of quality and file size for most 4K projects.
- Apple ProRes 4444 (*.mov) – choose this if you shot in 10‑bit 4:2:2 or need alpha channel support.
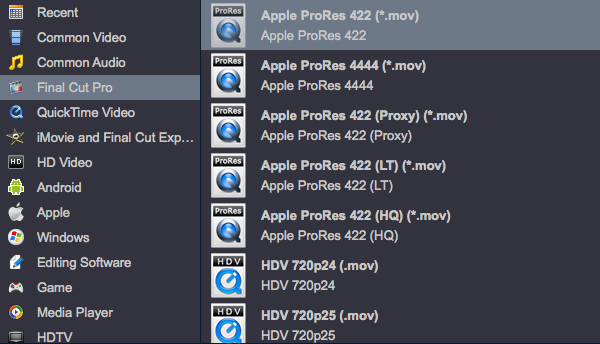
(Avoid selecting “ProRes 422 HQ” unless you require extra bitrate – standard 422 is sufficient for 10‑bit sources.)
Step 4 – Fine‑Tune Output Settings (Optional)
Click the “Settings” icon (gear) next to the profile. Here you can:
- Resolution – keep “Original” to retain your 4K (3840×2160) or DCI 4K (4096×2160) dimensions. Downscaling to 1080p is possible but not recommended for quality.
- Frame Rate – match your source (e.g., 23.976, 29.97, 59.94) – always choose “Same as source”.
- Audio – ensure “Copy” or “LPCM” (uncompressed) is selected – ProRes MOV containers support PCM audio without re‑encoding, preserving sync.
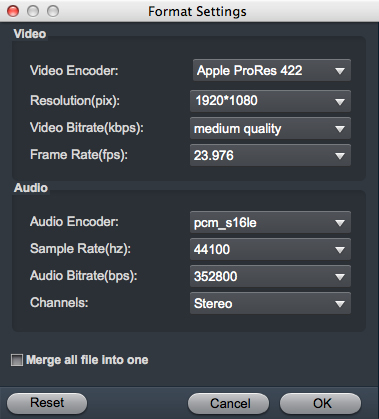
For HDR footage, enable “Color Space” to “Rec.2020” and “HDR to SDR” only if you need a non‑HDR deliverable – otherwise leave as is.
Step 5 – Start the Conversion
Click the large “Convert” button. The software will invoke hardware acceleration (if available) and transcode each clip to a .mov file with ProRes encoding. Time varies – a 5‑minute 4K HEVC clip usually takes 2‑4 minutes on an M1 Mac.
Step 6 – Verify and Import
Once done, locate the output folder. Open the ProRes files in QuickTime Player to verify playback. Then launch Final Cut Pro or DaVinci Resolve – import the new .mov files – you’ll experience buttery‑smooth editing, real‑time effects, and drastically reduced render times.
Additional Tips for a Smooth Workflow
- Batch Convert – process all your rushes overnight to avoid interrupting your creative flow.
- Proxy Workflow – if disk space is tight, convert only to ProRes Proxy (low bitrate) for editing, then relink to original media for final export.
- Metadata Preservation – ensure your converter retains timecode, reel name, and camera metadata (Acrok does this) – crucial for multicam syncing.
- Alternative Tools – if you prefer free/open‑source, try Shutter Encoder (with “Rewrap” to MOV + ProRes) or FFmpeg with the command:
ffmpeg -i input.mp4 -c:v prores_ks -profile:v 422 -c:a pcm_s16le output.mov
(but note that FFmpeg’s ProRes encoder may be slower and less optimised than Acrok’s hardware path.)
Final Words
Converting 4K XAVC HS to ProRes is not an admission of defeat – it’s a professional best practice that liberates your editing system from the constraints of highly compressed delivery codecs. Whether you’re colour grading in Resolve, cutting in FCP, or collaborating with others, ProRes remains the lingua franca of post‑production on macOS.
By following the steps above, you eliminate “unable to import” errors, reduce CPU/GPU strain, and gain the flexibility to work with advanced colour spaces and effects. Start your conversion today and reclaim your timeline performance.